Sage 100 Newsletter – Year-End 2018
Keeping You Up-To-Date With Information About Sage 100
Custom On-Screen Message in Sales Order Entry
Do you need to remind your order entry team to do something on a customer order? Perhaps to enter freight? A standard charge? Below I’m going to show you how to put a message on screen each time a sales order is saved. In the next edition of this newsletter, we take this a step further and only display the message under certain conditions (such as when freight has not been entered or for specific customer types). Let’s get started!
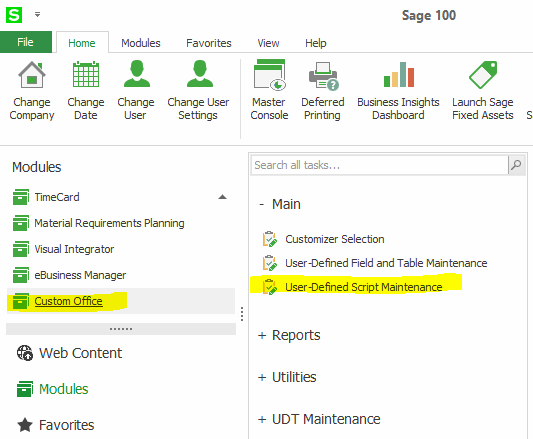
Step 1: Open Custom Office User Defined Script Maintenance
We’re going to write this in a language called VBScript. FYI: There’s lots of information to be had out there on the internet regarding this language, so if your interest is piqued, just start your search engine query with “VBScript tutorial” and you’ll be on your way. Now back to the task at hand… Expand the Custom Office module in Sage 100. Open “User Defined Script Maintenance” (a.k.a. UDS Maintenance).

Step 2: Create and name your script.
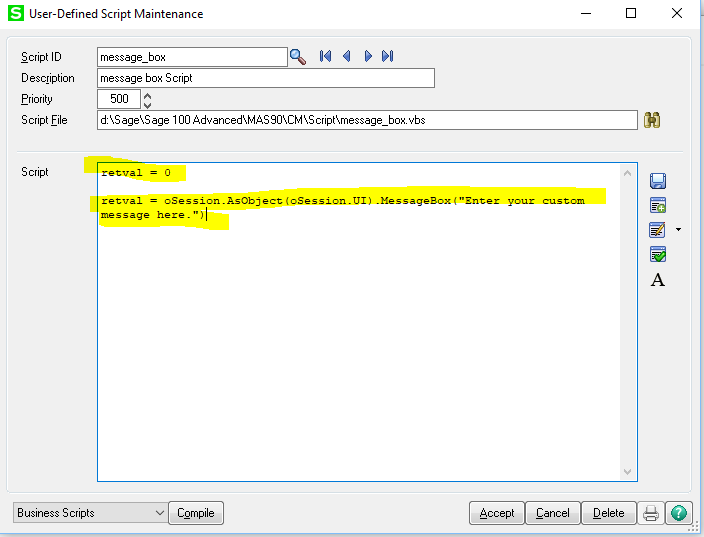
Type a descriptive name into the Script ID box. This name can be anything at all, but don’t use any special characters other than an underscore (or maybe a hyphen, but it’s not preferred).
Step 3: Write the code that will display a message box.
We’ll start with just the two lines of code below. I’ll explain what each one means in a moment. For now, you can simply type them verbatim into notepad. It should look like this:

Now let’s break it down.
The first line retval = 0 simply initializes a variable. That’s techie talk for preparing it for use. A variable is meant to hold some type of data. In this case, retval is numeric and is holding a zero (for now), hence the “= 0”. (If retval had been text, we would have typed retval = “”.) Retval stands for return value. Whenever we execute a line of code we like to get a return value. That tells us whether the code was a success or failure. Additional code would have to be written to check the value returned via retval, but we’re not going to do that today. Baby steps. Since this is a simple message box script, we don’t need to fret about failing a line of code right now. If you didn’t understand any of this retval stuff, don’t worry about it! Just put it in your script and watch it work like magic. And yes, you can sometimes get away without doing this bit, but it will come back to bite you one day. I promise.
The next line of code retval = oSession.AsObject(oSession.UI).MessageBox(“Enter your custom message here”) is actually putting the message box on screen. Obviously, you’re going to replace the “Enter your custom message here” with your own text. Again, retval would receive a value that you could later check. For example, if retval were still zero after executing the message box code, it would mean an error happened and we were not able to put the message on the screen for some strange reason. (We’ll save that for a follow-up article.)
When you’re done typing out the code, click “Accept” to save the script and close the UDS Maintenance window.
Step 4: Tell Sage 100 when and where to trigger the script and display the message box.
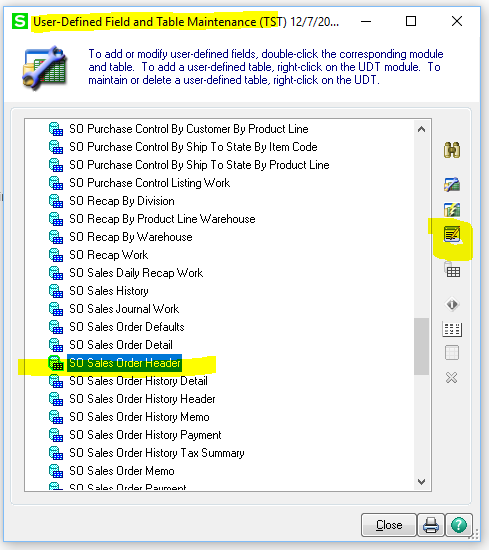
We’re going to tell Sage 100 that we want this message box to appear when we save a Sales Oder. To do that, open User Defined Field and Table Maintenance. Expand the Sales Order directory and click on “SO Sales Order Header.” Then, click on the script button to the right.

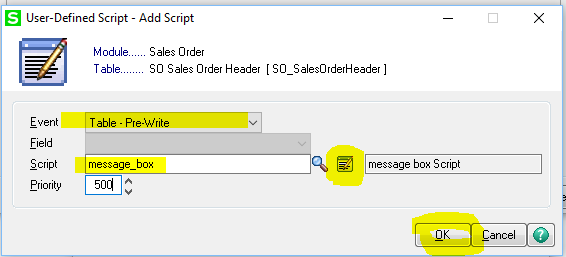
Click the green plus sign button on the right to add a script event (a.k.a. trigger).

Select the event “Table-Pre-Write” from the drop-down menu. Then, select your script using the lookup glass. This tells Sage that the script should run just prior to saving a sales order. Click OK when you’re done and then click “Close.”

Note: You’ll also need to close the User-Defined Field and Table Maintenance Screen. So you’re doing a lot of closing of windows, until finally… You’ll be prompted to compile the script. Go ahead and do that by clicking the “Compile” button. That basically rolls it into the Order Entry program and activates it. When that’s done compiling, go ahead and close any remaining windows.
Step 5: Ensure scripts are enabled in your company code.
Scripts must be allowed/enabled per company code in Sage. That’s as easy as checking a box, and you only need to do it once. Open Library Master> Main> Company Maintenance. Select your company code using the lookup glass. Then, click on the “Preferences” tab. If “Allow External Access” is not checked, do so now. Then click “Accept” to save your changes.
Step 6: Test your message box script!
Now you get to test drive your new script. Go into Sales Order and enter an order (or edit an existing one). Click “Accept” and watch as your nifty message box displays.
And that was the tough part. Be on the lookout for Part 2 in the next edition of our newsletter where we fine tune this bad boy. Happy scripting!


