
Sage 100 Newsletter – Q3 2024
Keeping You Up-To-Date With Information About Sage 100
Recording Vendor Online, Automatic or Wire Transfer Payments in Sage 100
Stop using check numbers to record non-check vendor payments!
What are non-check vendor payments? These are payments not processed with a physical check through your bank account. Here is a list of some examples of non-check vendor payments:
- Electronic Vendor Payments
- Wire Payments to Vendors
- Electronic Funds Disbursement to Vendors
- Cashless Vendor Transactions
- Automated Vendor Payments
- Non-Cash Vendor Payments
- Manual ACH Payments to Vendors
- Virtual Vendor Payments
- Payment via EFT to Vendors
- Instant Vendor Transfers
- Non-Traditional Vendor Payments
- Prepaid Vendor Transactions
- Third-Party Payment Solutions for Vendors
- Payment Processor Transactions with Vendors
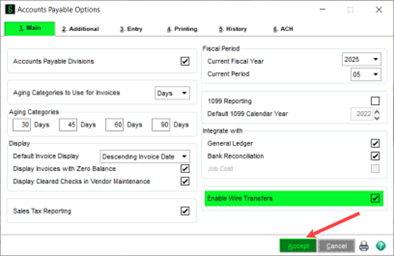
Instead of using a check number to record an online, automatic or wire transfer payment, you can enable the wire transfer option in Sage 100. Here are the steps to enable and use Wire Transfer feature:
1. All users must exit Accounts Payable-related tasks.
2. Accounts Payable, Setup, Accounts Payable Options, Main tab.
3. Check, Enable Wire Transfers and click, Accept.
These payments are entered in Manual Check and Payment Entry:
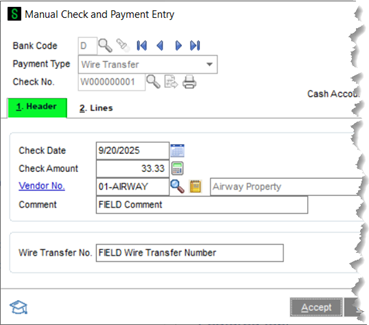
4. Accounts Payable, Main, Manual Check and Payment Entry.
5. Select Bank Code.
6. Select Payment Type, Wire Transfer.
a. If you need to reverse a Wire Transfer select, Wire Transfer Reversal.
7. The Check No will auto-assign beginning with a “W”.
8. On the Header tab, (you will notice the word check changed to transfer):
a. Enter Transfer Date.
b. Enter Transfer Amount.
c. Select, Vendor Number.
d. Enter Comment, if applicable.
e. Enter Wire Transfer Number, if applicable.
This field is perfect for payment confirmation or other payment reference information.
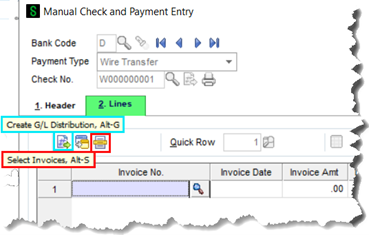
9. On the Lines tab:
a. Select, Invoice Number OR click General Ledger Distribution.
b. Enter Invoice Amount.
(Select GL Account and enter Amount, if applicable)
c. Click, Accept.
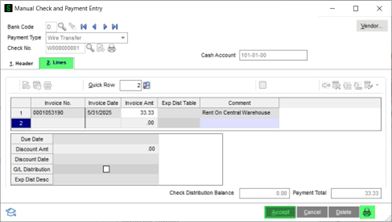
10. Click the Printer icon to update the Manual Check and Payment Register.
Or, you can select from the Accounts Payable Main menu.
11. Enter, Accounts Payable Posting Date.
12. Check, Print Full Comments, if desired.
13. Click, Print or Preview – your regular business practice.
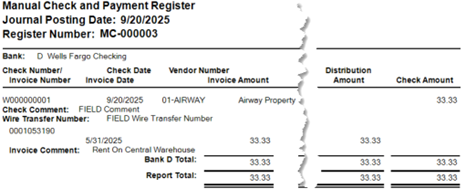
14. If the register is accurate, especially Posting Date, click Yes to update:

15. Follow your business practice on updating the Daily Transaction Register.
Here is what the Wire Transfer payment transaction looks like in Vendor Maintenance and Inquiry:
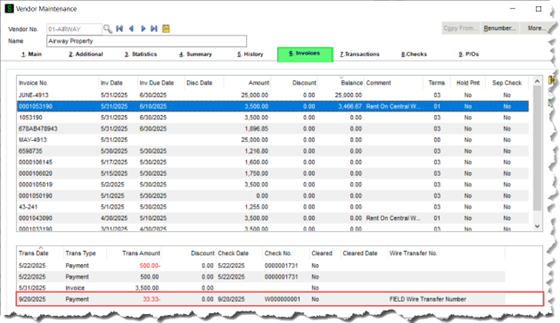
You will see the Wire Transfer Number column is added.
This is perfect for quickly identifying that payment’s confirmation number at-a-glance!
If you have any questions, please contact our Sage 100 Help Desk:
Phone: 646-293-1777
Email: helpdesk@netatwork.com


